The Calculated Columns node enables users to manipulate columns during the data flow using a PQL script. Once the node has been connected to the relevant table, provide a PQL script in order to create or manipulate column values, or perform calculations on existing column values, and add these manipulations as an additional column.
While the other column operation functions offer shortcuts to standard column operations, the calculated column is more advanced. It produces a new column of values using free-form functions based on a user-defined PQL expression.
You can provide a SQL expression by writing or pasting it directly into the quick script editor, or you can open the PQL formula editor. The PQL editor exposes the data model's meta-structures, and features drag and drop functionality and intellisense, so that you can easily pick and choose the required functions and meta data.
Quick Script Editor
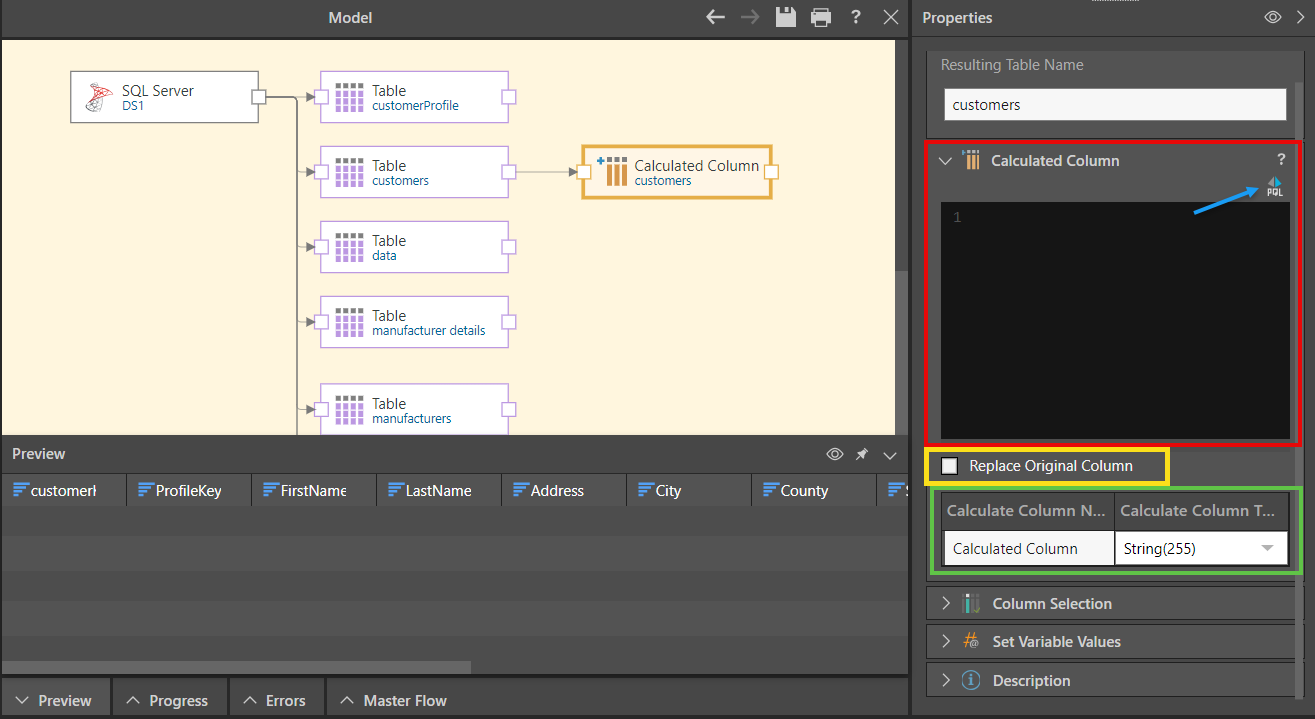
Write a PQL expression in the quick script editor (red highlight below):
- Use square brackets to select a column
- PQL scripts are case-sensitive - make sure that column headings are written in the correct case
Enable the Replace Original Column option (yellow highlight) to replace the existing column with the new calculated column. If disabled, the new column will simply be added to the table, alongside the original.
Under Calculated Column Name provide a name for the new column, and under Calculate Column Type select the relevant column type (green highlight).
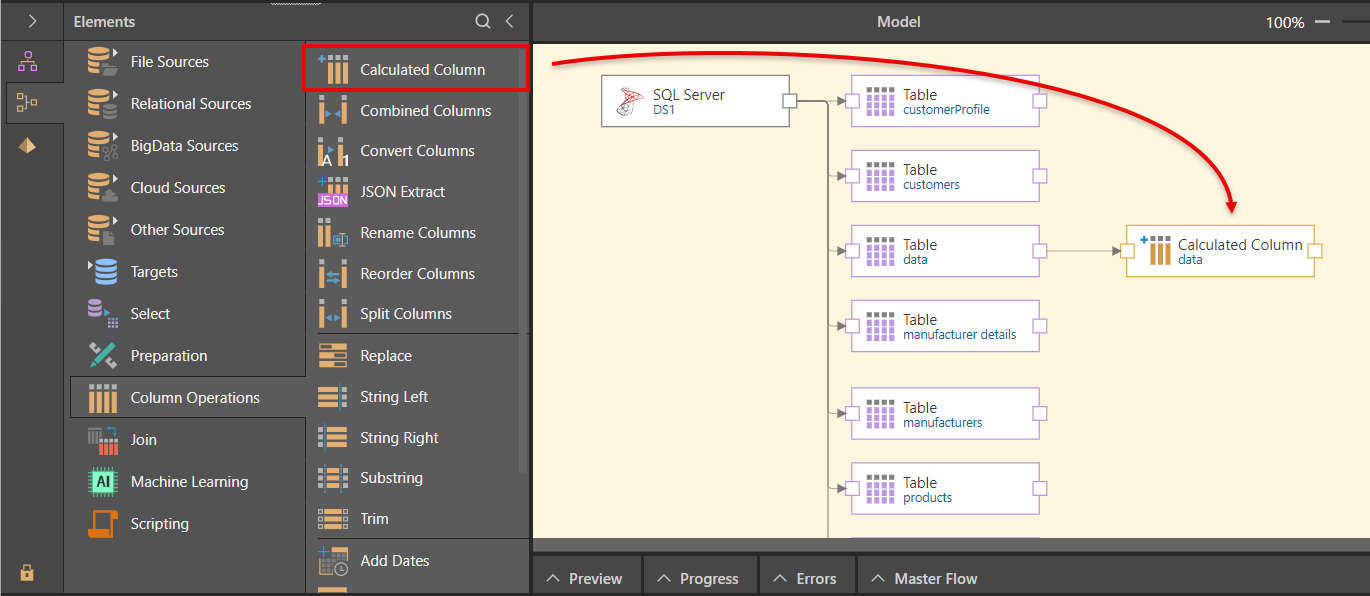
PQL Editor
The PQL Editor is a script-writing interface with drag and drop functionality and intellisense. The editor exposes meta structure of the data model, as well as the menu of PQL functions. Using drag and drop functionality you can construct your PQL expression by selecting the required functions and meta data.
Open the PQL Editor by clicking the Advanced Script button (blue arrow above) in the Calculated Column window.
- Click here to learn more about the PQL editor.
Adding a Calculated Column
Step 1: Add your node
Add the Calculated Column node to the canvas and connect it to the relevant table.
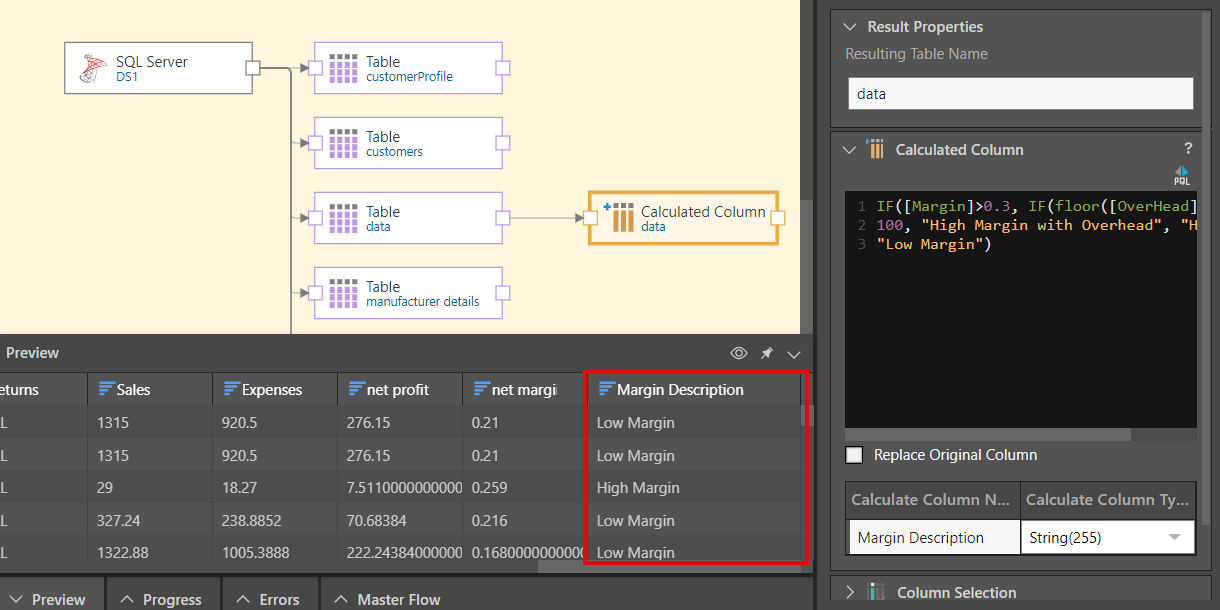
Step 2: Write your PQL Script
In the Script window, write your PQL script. Open the PQL editor (red arrow) to write your PQL expression by selecting the required functions, columns, variables, and elements. For details about PQL, click here.
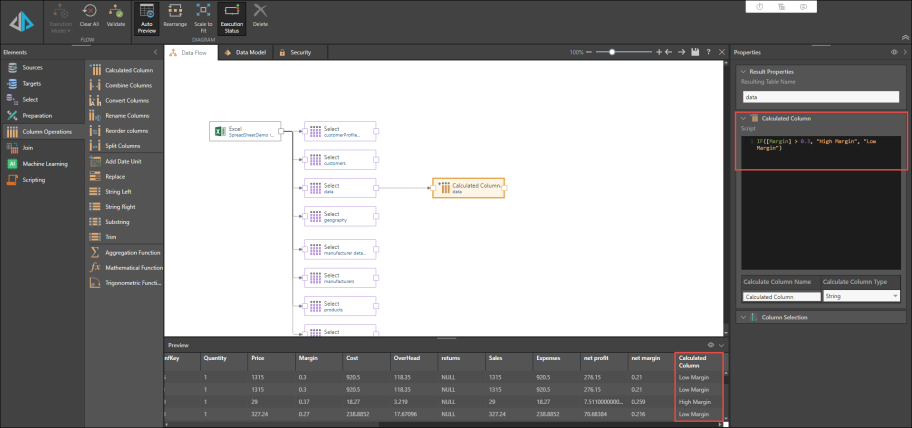
In this example, the following script was used.
IF([Margin]>0.3, IF(floor([OverHead])> 100, "High Margin with Overhead", "High Margin"), "Low Margin")
In this example, the new calculated column is added to the table alongside the original column (yellow arrow).
Name your calculated column, and select the column type (green highlight).

Step 3: Preview your Result
Click the  to preview.
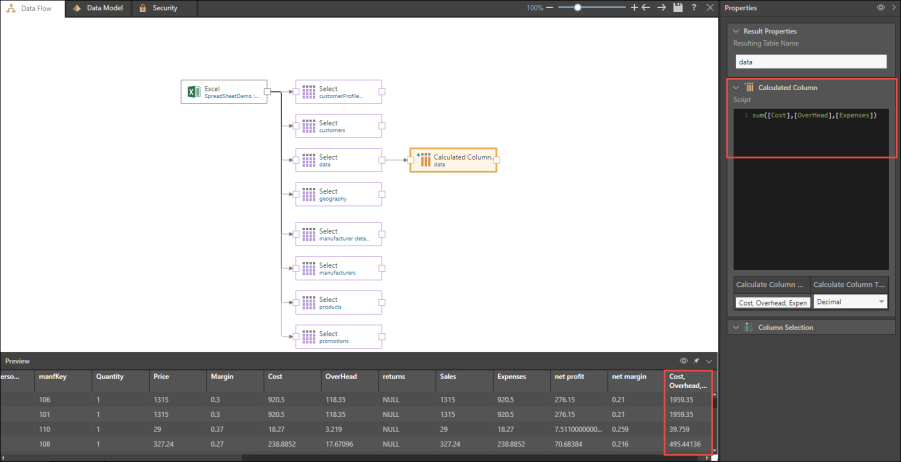
Below, the PQL sum function has been applied to create an additional column combining the values from the Cost, Overhead, and Expenses columns:
sum([Cost],[OverHead],[Expenses])
In this example, an If statement is entered into the script window, to generate a new column that will return a result of either High Margin or Low Margin, based on the Margin and Overhead columns. If the margin is greater than 0.3, the calculated column will return High Margin; if it's equal to or less than 0.3, it will return Low Margin:
IF([Margin] > 0.3, "High Margin", "Low Margin")
Case conditional logic enables you to build a decision within the result of the formula. The index of the given criteria should match the index of the outcome. The syntax for a case statement is:
- <critera_set>: insert the set of criteria (columns)
- <outcome_set>: insert the index of outcomes - these are the results that should be returned when one of the criteria is met. The outcome set index should match the criteria set index.
- <default_value>: insert the default value that will be returned when the given criteria are not met
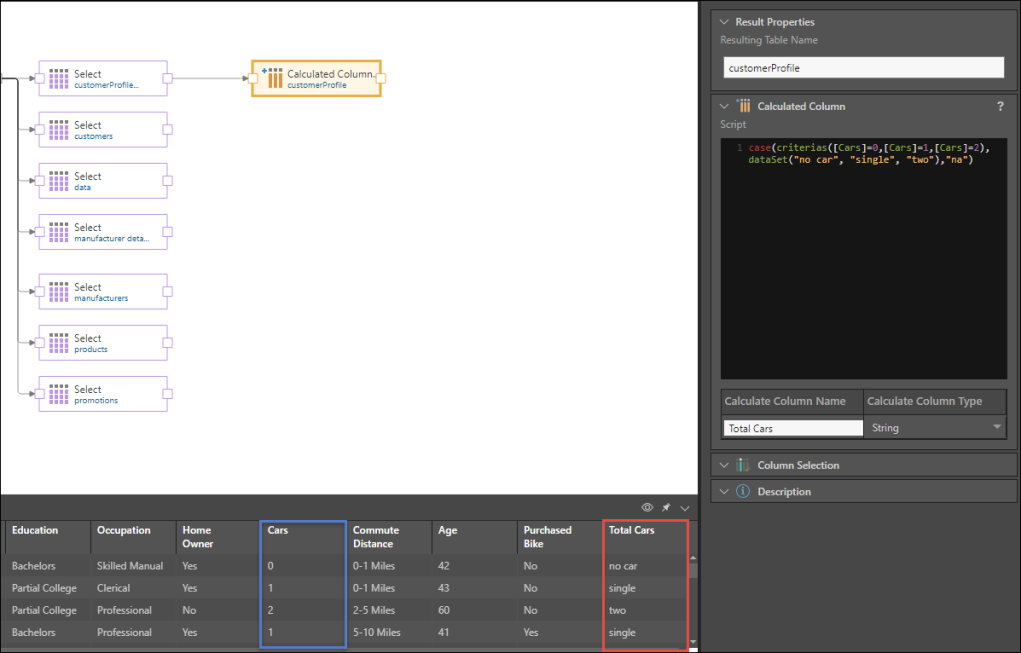
In this example, a column is added with the number of cars for each customer, based on the following statement:
case(criterias([Cars]=0,[Cars]=1,[Cars]=2), dataSet("no car", "single", "two"),"na")
If the number of cars is 0, the statement will return the string "no car". If the number of cars is 1, "single" will be returned, and if it's 2, "two" will be returned. If the number of cars is not equal to 0, 1, or 2, then "na" will be returned.
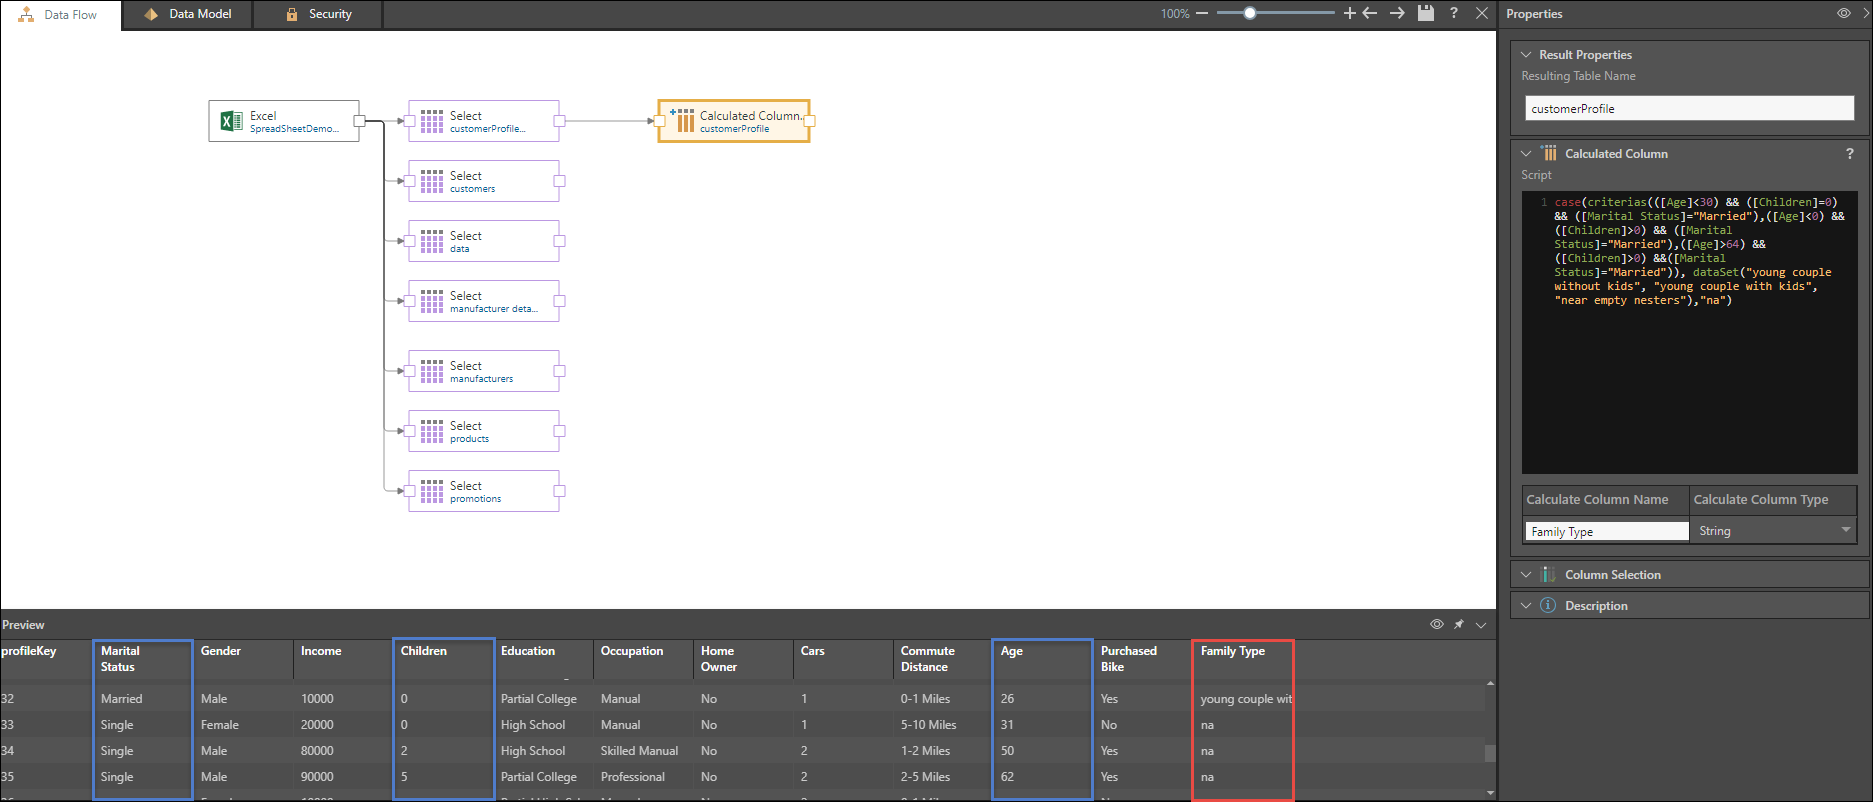
In this example, the statement will return a column with the following strings: "young couple without kids," "young couple with kids," "near empty nesters," or "na." The results returned will depend on combinations of the following criteria: age, number of children, and marital status.
- Where age < 30 and children = 0 and marital status = married, "young couple without kids" is returned
- Where age < 30 and children > 0 and marital status = married, "young couple with kids" is returned
- Where age > 64 and children > 0 and marital status = married, "near empty nesters" is returned
- Where none of the above criteria sets match the customer profile, the default value of "na" is returned.
In PQL the statement is:
case(criterias(([Age]<30) && ([Children]=0) && ([Marital Status]="Married"),([Age]<30) && ([Children]>0) && ([Marital Status]="Married"),([Age]>64) && ([Children]=0) && ([Marital Status]="Married")), dataSet("young couple without kids", "young couple with kids", "near empty nesters"),"na")
Note that in this example, each criterion in the <criteria_set> contains 3 criteria. Enclose each criterion in brackets (), and use && to join each set of 3 criteria as one criterion within the <criteria_set>. As usual, use a comma as the delimiter between each of the criteria in the <criteria_set>, i.e.
([Age]<30) && ([Children]=0) && ([Marital Status]="Married"),
Related information
Common Properties
There are a number of fields that are present in the Properties panel when you have any of the preceding nodes selected on the canvas. These fields include Result Properties, Column Selection, Set Variable Values, and Metadata.
- Click here for more details about the Common Properties